
 Reagent Testing Kit")
 Reagent Testing Kit")
 Reagent Testing Kit")
 Reagent Testing Kit")
 Reagent Testing Kit")
DanceSafe’s ketamine test kit consists of two liquids (Morris A and Morris B). It is currently the only kit on the market able to distinguish ketamine from DCK, 2-FDCK and other novel dissociatives (and it can also identify cocaine). See detailed instructions below. Each kit performs 50-75 tests. Includes one free fentanyl testing strip and one free amphetamine testing strip.
Why test ketamine?
As ketamine has become more popular, an increasing number of drugs are being misrepresented and sold as ketamine. These include PCP analogs, ketamine analogs, benzodiazepines, and other novel dissociatives. These drugs all have different effects and durations, different safety profiles, and need to be dosed differently.
NOTE! Mandelin reagent has been used to test ketamine in the past, but it is often inconsistent and can produce similar reactions with many other drugs besides ketamine. We no longer recommend using Mandelin reagent to test ketamine.
HOW TO TEST KETAMINE
Check the Dancesafe website for any updates to these instructions.
Use Morris reagent.
Step 1:
On a white ceramic plate, put a drop of the pink liquid (bottle A) onto a small amount of your sample.
Step 2:
Next put a drop of the clear liquid (bottle B) on top of the exact same sample.
Step 3:
Stir the mixture with a toothpick or the sharp point of a knife for 20-30 seconds.
Step 4:
After stirring, compare the resulting color with the images below.
NOTE! Although still rare, we are seeing increasing cases of ketamine being contaminated with fentanyl and/or amphetamines. Use our immunoassay test strips to test your ketamine before you consume it. Read and follow the instructions carefully for each type of strip.
MORRIS REAGENT WORKS DIFFERENTLY
Most reagents contain acids that break down molecules through a chemical reaction, dissolving the drug entirely and producing a color change almost immediately. Morris reagent is different because it simply comes in contact with the molecules and changes colors if those molecules belong to specific drugs (like ketamine). That’s why you need to stir the mixture after you place one drop from each bottle onto the sample. Stirring mixes the two solutions together so you can see the proper, final color. Use a toothpick or the point of a sharp knife and stir thoroughly for a full 30 seconds.
Ketamine is the only drug we know of that turns purple in the end. Most drugs don’t react at all, and end up a dull green color. This is the color you will see simply by combining one drop of each liquid together, with no drug sample at all. We call this a “blank” and you may find it useful to put a blank on your plate first, to see what it looks like. The vast majority of drugs will not react with Morris reagent, producing this color.
When you drop the first drop onto your sample from bottle A (the pink liquid), you may see specks of blue appear, as in the photo to the right. Ignore this. Many substances will do this. It’s only after adding a drop from the second bottle and stirring that you will see the proper and final color.
CAUTION! We know of at least one company that also sells a version of Morris reagent. They sell primarily to law enforcement, and their product consists of small ampules that you break open inside a clear, plastic pouch. This method does not work. It does not reveal enough color detail to distinguish between various drugs, and can often produce false positives. Do not use a test tube. You must use a white, ceramic plate as your testing surface and stir the mixture as described below.
HELP DANCESAFE LEARN MORE ABOUT MORRIS REAGENT
Although we tested dozens of drugs with Morris reagent and none of them reacted like ketamine (most didn’t react at all), there may be some we haven’t tested that do turn purple, or that produce a unique color of their own. If you discover a drug that reacts with Morris reagent (that does not turn dull green), please email a photo of the reaction to eman@dancesafe.org
Notes on Other Dissociatives
Dancesafe tested the following novel dissociatives and only two of them, deschloroketamine (DCK) and 2-fluoro-deschloroketamine (2-FDCK), reacted at all. They both turned a dark blue/gray color. All the others turned dull green, indicating a non-reaction. The following dissociatives are non-reactive:
• phencyclidine (PCP)
• deschloro-n-ethyl-ketamine (2-OXO-PCE) • 3-methoxy-PCP (3-MeO-PCP)
• 3-chloro-PCP (3-Cl-PCP)
• 3-methoxy-PCE (3-MeO-PCE)
• 2-oxo-PCE (O-PCE)
• methoxpropamine (MXPr) • methoxetamine (MXE)
• ephenidine (EPE)
• diphenidine (DPD)
WHAT ARE REAGENTS?
Reagents are chemicals that change color when they come into contact with certain drugs, enabling you to detect their presence in a sample. Reagents cannot, however, detect every drug, nor can they tell you how pure or potent your drugs are. Even if you get the expected color reactions for the drug you want, there could still be one or more other drugs present. This is because:
- Not all drugs change color with reagents.
- Darker colors may overshadow lighter colors.
- A very tiny quantity of a drug may not produce a visible color change.
Despite these limitations, reagent testing is useful for identifying the presence of specific drugs, and——most importantly——for determining whether your sample does not contain the drug you want.
REAGENTS CAN
- Detect the presence of certain drugs
- Inform your decision about whether or not to consume a drug
REAGENTS CANNOT
- Tell you how potent your drugs are
- Tell you if your drugs are pure
HOW TO USE REAGENTS
1 Place a tiny amount of your drug onto a white, ceramic plate. Make it about the size of a pinhead. We will refer to this as the “sample” of your drug. For pressed pills, use a sharp knife to scrape the powder off the side. For blotter paper, cut off a tiny piece of the corner. For liquid drugs, place one drop onto the plate.
2 Carefully place one drop of reagent onto the sample. Do not let the bottle touch the sample or you will contaminate the entire bottle of reagent. If you are using a 2-bottle reagent such as Simon’s, Folin, or Morris, place one drop from bottle A and then one drop from bottle B onto the same sample.
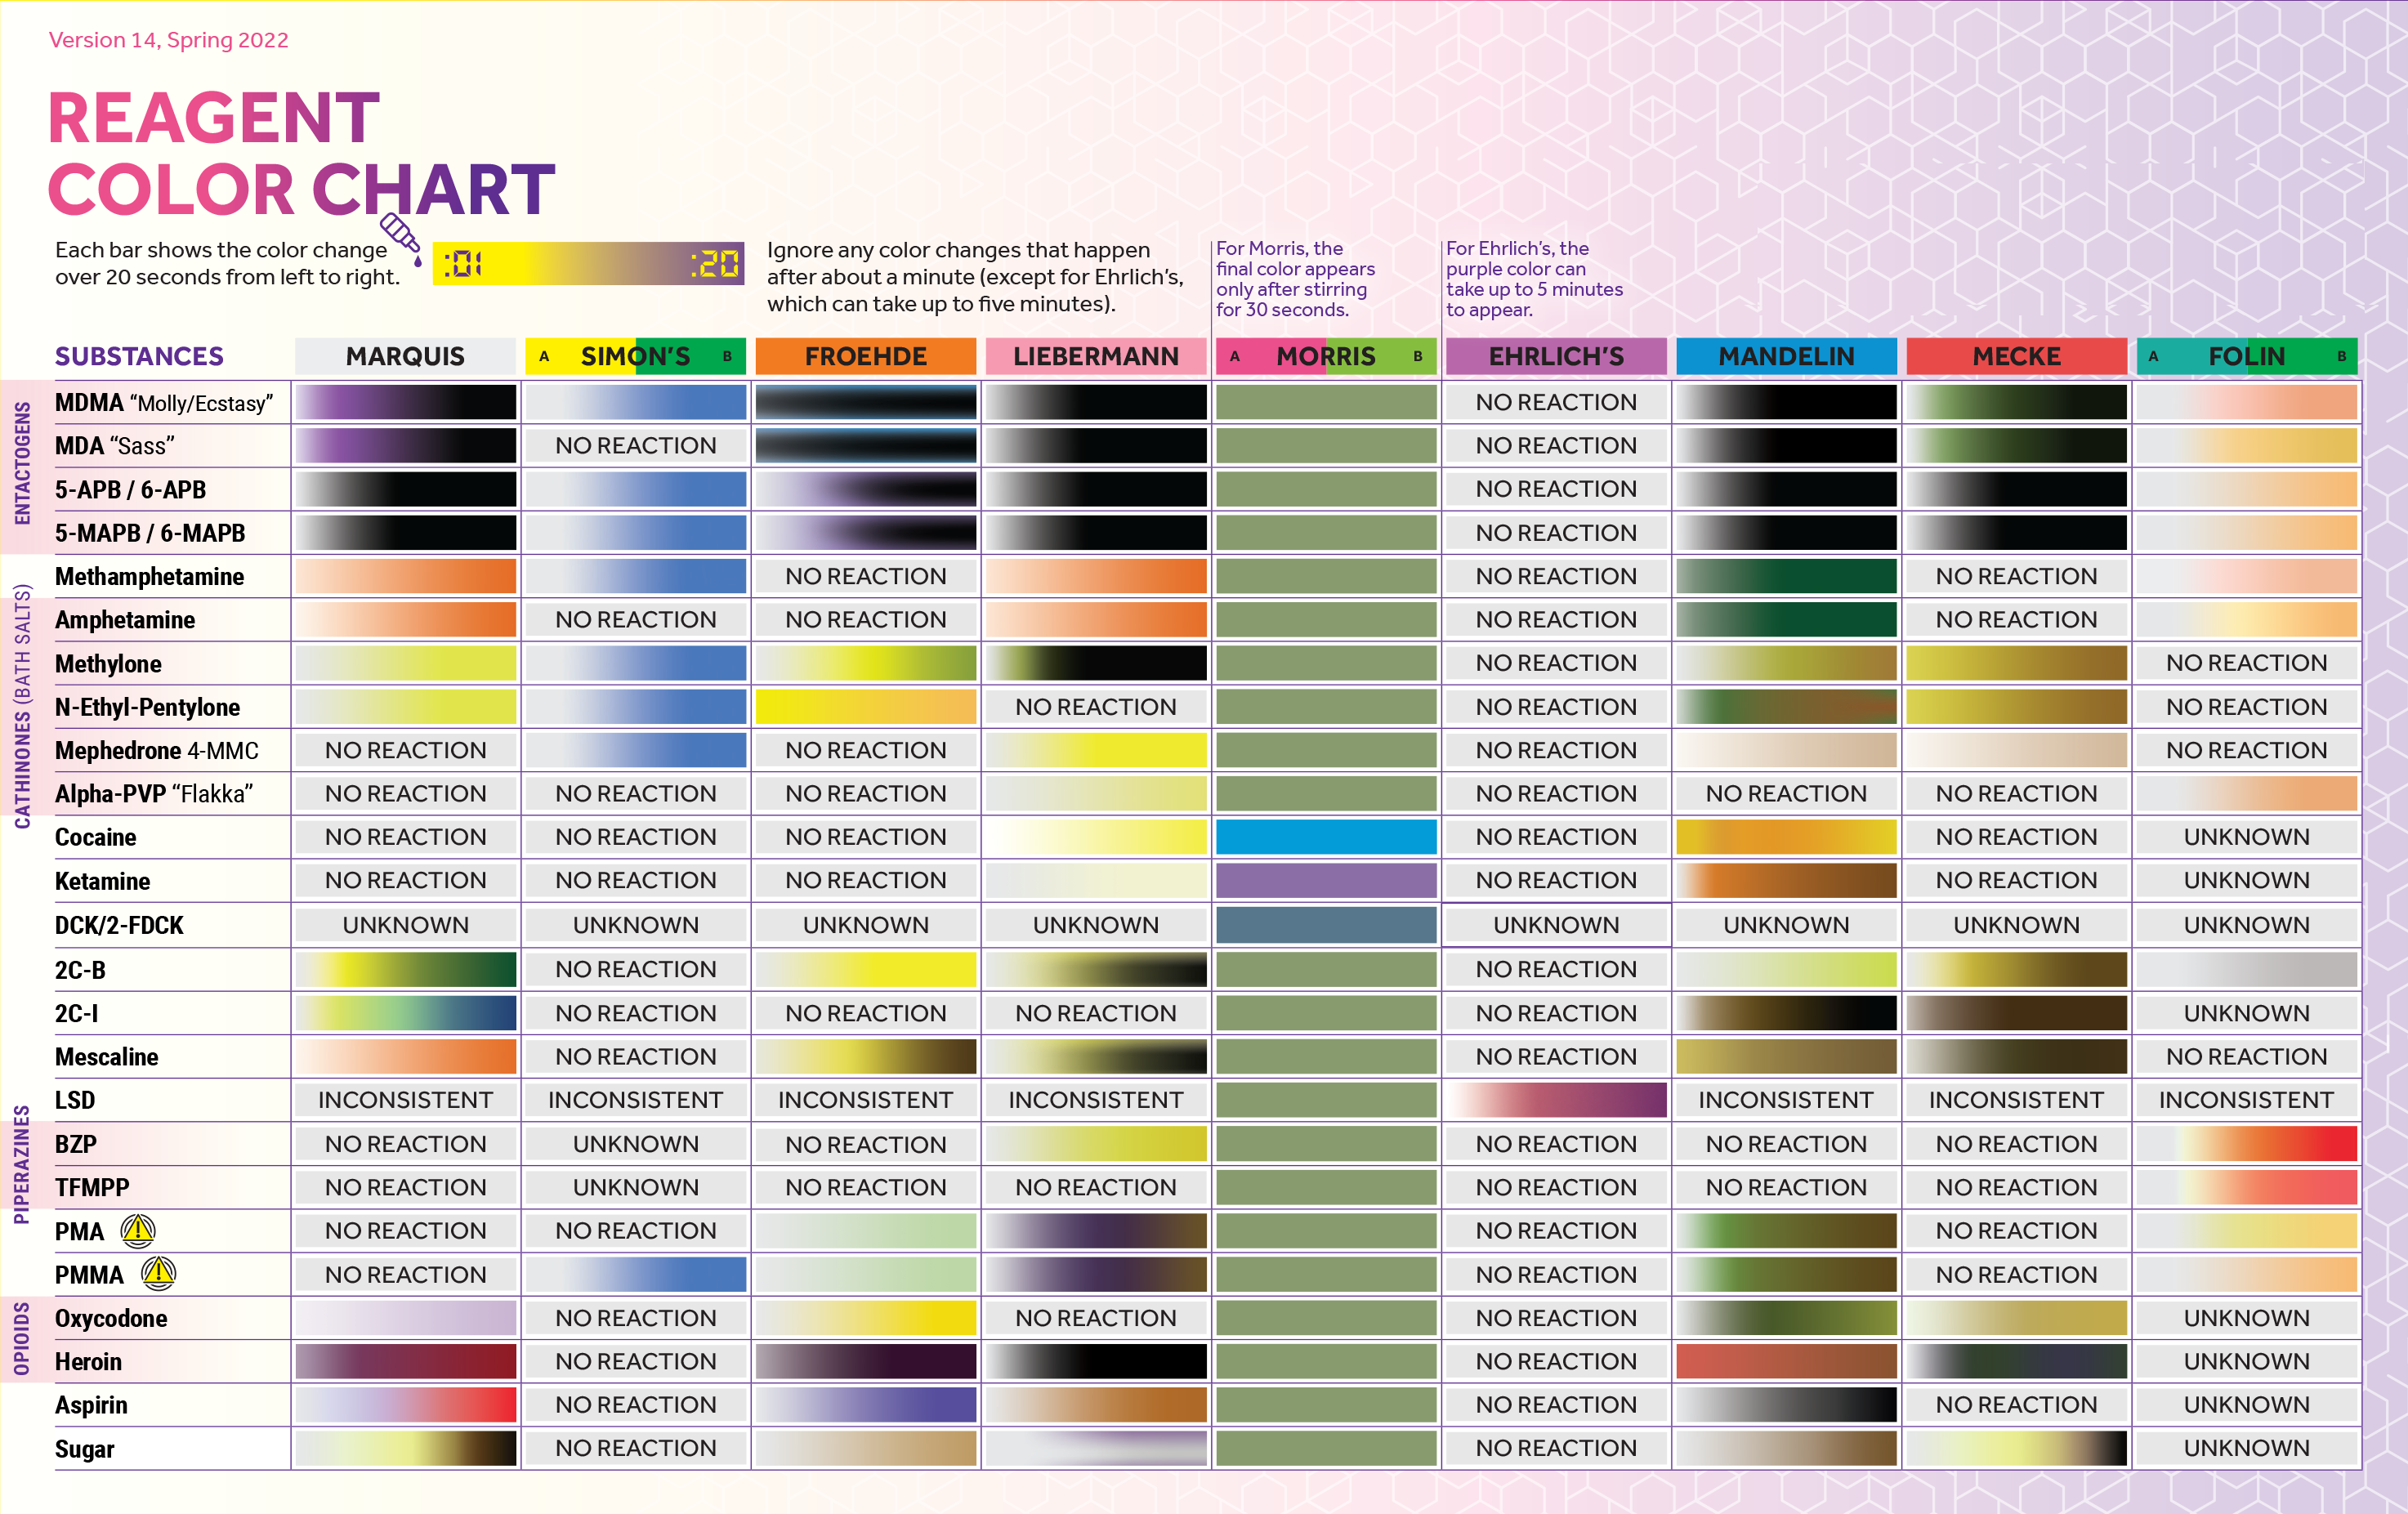
3 Observe the color change and compare with the enclosed color chart. Most reagents will change color within twenty seconds.
- Ehrlich’s reagent can take up to 5 minutes.
- Morris reagent needs to be stirred (use a toothpick or the sharp point of a knife).
The final color will appear after stirring for a full 30 seconds.
4 Repeat. Most drugs need to be tested with more than one reagent. When using multiple reagents, put the cap back on the first reagent and repeat the process with the next reagent using a new sample from the same batch that you’re testing.
5 Clean up. Use baking soda to neutralize 5 the chemicals, then wash the plate with soap and water.

THE COLOR CHART
Below are reactions for some of the most commonly used drugs. For more color reactions, see this reddit page.
STORAGE AND HANDLING
Keep reagents out of heat and sunlight to prolong the shelf life. If stored in a refrigerator or freezer, most reagents will last a year or longer. (Make sure to thaw them out to room temperature before use.) Dispose of unused reagents at a hazardous waste facility.
- Mandelin reagent starts out light orange in color and turns cloudy yellow after 3-4 weeks. This is okay. Make sure to shake the bottle before each use.
- Marquis and Mecke reagents begin as clear liquids and gradually darken over time. This is okay. They are only expired when the liquid in the bottle becomes so dark that you can no longer see the color reaction.
If contact is made with the skin, wash with water immediately. If it gets in the eyes, flood the eyes with water for at least 10 minutes, holding them open. If accidentally ingested, rinse the mouth. Do not induce vomiting. Drink water and seek immediate medical attention.
Please note: We cannot accept any returns or exchanges with Dancesafe Reagents and Kits as the outer packages, containers and reagent bottles are not tamper proof. It's really important (potentially life and death) that every reagent or kit we provide is fresh from Dancesafe and has not been tampered or opened before reaching any customers. Thank you for understanding. We recommend choosing carefully, and please call us on 0800-HEMPSTORE if you have any questions, before you order. You can rest assured any reagent or kit you purchase has come direct from Dancesafe to us and then to you.


